Well so I have been sewing like crazy this week! I have so many projects to complete! I just shipped out an etsy order today and dropped off a large order to my local baby shop on Tuesday. Still have a cake-pop order to complete before tomorrow (yep I do that too) and a custom costume to make asap, a custom order for the baby shop, and a custom top for a friend....oh yeah and I still have some stuff to sew for my baby girl before she arrives anytime! So it figures that this is the week I would be put on modified bed rest! Ughhhh! I rode the little scooter around Target today, while I was there picking up the cake mixes. Have you any idea what it feels like to be in your 20's and getting stuck in the isles of the baby section with a power scooter and then having to alert everyone around you with that "BEEP BEEP BEEP" while you back up? Well I do now. I just took a deep breath and said "This is best for my baby". Oh the humiliation you go through as a mom sometimes!
So I do have some projects coming down the pike to share with you but I don't know when. I hope to complete my next tutorial before she arrives because I really want to have it when I bring her home! I'm going to be showing you how to make a normal boppy into one of those fancy new boppy newborn loungers! Yeah, I still have my boppy from when my 2-1/2 year old was born and I don't want to buy another one so I'm going to make a slipcover that turns it into a lounger, but can be removed when I want to use it to nurse! Clever ehh??
Hope you all are doing great!
Thursday, August 30, 2012
Friday, August 24, 2012
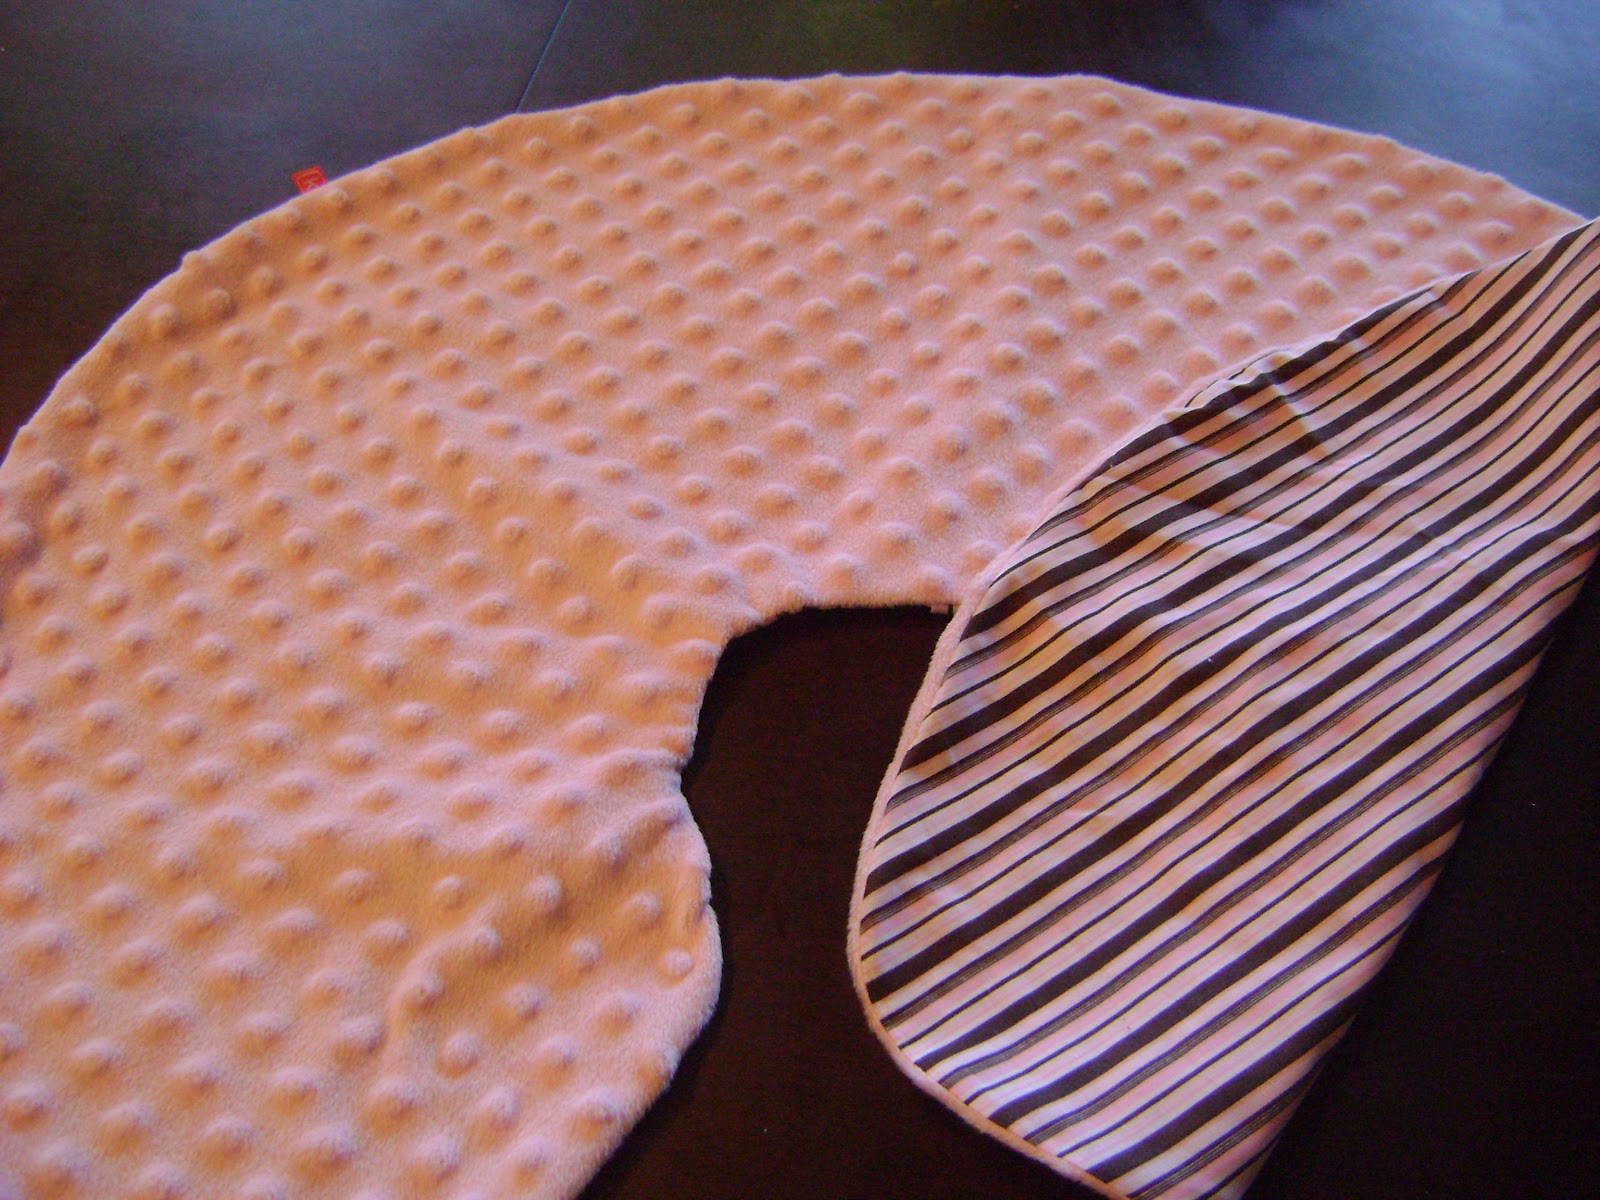
Make a Boppy Slipcover: Tutorial

I'll teach you how to make a Boppy cover without a zipper. It's easy, it's cheap and it should take less than an hour.
Ok so for any sewing project, to start out you need a few things: besides the sewing machine and thread, you need fabric and a pattern. I chose to use cotton on one side and super-soft minky on the other. With this pattern, there is a bottom so you need to decide which one is going to be the top. If you choose to use minky, there's no reason to use it on both sides except for aesthetics. Minky is going to run you $14.99/yard (regular price) at Joann's so conserve your expensive fabric and use a cute quilting cotton on the bottom instead! This also helps to make it a bit sturdier since Minky is very stretchy and cotton is not.You need 1/2 yard of the top fabric and 1/2 yard of the bottom or 1 yard if you are using the same fabric. There are so many cute fabrics out there to choose from! I love all the printed flannels out there that are super soft too! That might be my next one.

Ok now that you have all your supplies ready, it's time to get started!!
Fold your minky (or whatever fabric you chose for the top) in half and lay it out. Lay your pattern on top, lining up the FOLD line with your fold in your fabric. Carefully cut it out. You can pin your pattern down if you like.


Now cut this in half along the fold.


Then fold again and measure another 1" seam and iron.
Now if you have a serger, you can serge it, cutting off 1/4" and then fold 1" and iron. This is probably what I will do in the future, but it was naptime and this fabric just made it too easy!
Now sew your seam at about 7/8" and repeat for the other piece. Don't forget to backstitch at the beginning and end of each seam.

Pin generously!


Now you need to stabilize the seam. Either serge it or trim it and run a zig-zag seam all the way around.


If you are wondering just how cheap this project is, here's the breakdown:
1/2 yard of minky: $3.75 (I only buy minky if I have a coupon or it's on sale. I had a 50% off coupon for Joann's)
1/2 yard of quilters cotton: $2 (You can easily get a cute print for $3.99/yd or use a coupon
Out of pocket cost: $5.75
Time spent: 1/2-1 hour
Boppy brand minky slipcover: $25.99
Whoo-hoo! You just saved $20 in an hour or less!
Now go make a couple of these for yourself or your preggo friends!
Welcome!
Hello!
Decided to make a blog for all of my sewing and crafting projects. I'm not really creating my own patterns for the most part so I'll be linking back to the original tutorials for you so you can create stuff too! This way, I'm not locking up my facebook page with tons of pictures of everything I make. I have a few orders I'll be working on today and this coming week so keep your eyes peeled for cool stuff to come!
For now, I'll just show you my cool new labels I finally got 4 weeks after ordering. They were worth the wait!!! I made 2 dresses for a friend and a top for Eisley and 3 pairs of pj pants this week and they all were adorned with these gems...so adorable!
I got them from Worldwidelabel on Etsy. I modeled them from this site Make it and Love it. I love her blog and loved the simplicity of her design. Derek suggested the kalleymade name instead of "Handmade by Kalley" which is what I was going to do. I used to use the "kalleymade" a long time ago for stuff I made.


 And in case you were wondering...here's what I'm workin' with: Two Brother machines that I love! My sewing machine is a Brother Project Runway special edition CE-5000PRW. I got mine on Craigslist brand new. This is a similar one.
My serger is my most recent purchase and I'm in love with it. I hate to hem and zig zag stitch and it saves me so much time on both of those....plus the ease it brings in working with knits! I am still learning how to use it but it's a lot of fun. The only downside is it's very loud so I can't use it during naptime. I have to strategically plan my steps so that I only cut patterns or use the sewing machine during naptime and serge other times. It's a Brother 1034-D.

Here's the little monkey that I make most of my stuff for in her new peasant top.

The other stuff I make besides for Eisley and little baby girl who will be making her first appearance in a few weeks, is for my Etsy Shop and for this little local baby shop or for friends who ask for custom stuff because they know I sew.
Hope to see you around and hear from you!!
Decided to make a blog for all of my sewing and crafting projects. I'm not really creating my own patterns for the most part so I'll be linking back to the original tutorials for you so you can create stuff too! This way, I'm not locking up my facebook page with tons of pictures of everything I make. I have a few orders I'll be working on today and this coming week so keep your eyes peeled for cool stuff to come!
For now, I'll just show you my cool new labels I finally got 4 weeks after ordering. They were worth the wait!!! I made 2 dresses for a friend and a top for Eisley and 3 pairs of pj pants this week and they all were adorned with these gems...so adorable!
I got them from Worldwidelabel on Etsy. I modeled them from this site Make it and Love it. I love her blog and loved the simplicity of her design. Derek suggested the kalleymade name instead of "Handmade by Kalley" which is what I was going to do. I used to use the "kalleymade" a long time ago for stuff I made.


 |
| Here's what the little k labels look like. I put them on the side seam of whatever I'm making. |

My serger is my most recent purchase and I'm in love with it. I hate to hem and zig zag stitch and it saves me so much time on both of those....plus the ease it brings in working with knits! I am still learning how to use it but it's a lot of fun. The only downside is it's very loud so I can't use it during naptime. I have to strategically plan my steps so that I only cut patterns or use the sewing machine during naptime and serge other times. It's a Brother 1034-D.


 |
| Cheese! |
 | |
| Yeah she was done posing but this is a better shot of her peasant top. I modeled it after this post, sizing it up using a pillowcase dress sizing chart. |
Hope to see you around and hear from you!!
Subscribe to:
Posts (Atom)