Wednesday, August 7, 2013

Farmer's Market Pasta

We recently moved about 25 miles from our old home.  My husband and I both work in the city we moved to and I have really been looking forward to the small town feel and family friendly events they always plan.  I've been taking my girls to their downtown farmer's market every Saturday and my instagram has been focused on all our delicious finds every week.
So this Saturday evening I decided to use a lot of the veggies I picked up to make a delicious pasta dinner.  I have to say, this pasta far exceeded my expectations!  I expected it to be yummy but I seriously could NOT take a bite without telling my husband "holy crap this is so good!"  He felt the same...score!  And the best thing is, it works really well reheated or cold.  The flavors have even more time to meld that way!
Ok let's get down to it.

Farmer's Market Pasta


You can swap out various vegetables (yellow squash and portabella mushrooms would be great additions) but here are the ones I included:
2 zucchini
1 red onion
1 red bell pepper
1 green bell pepper
1 lb pasta
1 cup cheese of choice (I used feta but parmesan or mozzarella would be great)
olive oil
salt
seasonings (I used oregano, parsley and a pampered chef seasoning mix called "Sun dried tomato herb seasoning mix")
I also added some fresh basil
Pine nuts (optional)  I didn't have any but man, it would've been so good!

Directions:
Set your oven to broil.  Start a large pot of water to boil.  Wash and cut your vegetables.  The zucchini, I quartered them lengthwise, then sliced them about 1/2".  All the rest, I cut into 1/2" chunks.  Put all your veggies on a rimmed baking pan and drizzle GENEROUSLY with olive oil.  

Season up with your chosen seasonings and put it in the oven on the middle rack.  Now cook your pasta according to package directions.
If you have pine nuts, carefully toast those puppies in a small saute pan.
When your pasta is done, drain it and set aside to cool a bit.  Stir your veggies occasionally so they don't burn and are evenly coated.
Your veggies are done when they are easily pierced with a fork but not mushy.  Stir your pasta, veggies (with olive oil from the pan) and cheese together.  This is when you'll add any fresh herbs too.  Check your seasoning now and add salt if needed.

That's it!  You're done!  Eat and enjoy!!

If you have a baby like I do, just grind up this delicious harvest and serve it up!  Nothing better than fresh veggies for your babe!

Monday, August 5, 2013

Summer Burlap Wreath

Hello there.
It's summer.  In full swing.  And I just moved into a new house.  Time to spruce up the front door!

The Summer Burlap Wreath

This is a fairly simple afternoon project.  It's really cheap too.  I used less than a yard of burlap at $3.29 a yard and the wreath form was only a couple bucks at walmart.  The rest of stuff I already had (FREE!).  Yay I like that price!

Let's get started!
A half- 2/3 yard of burlap and a foam wreath form.  I bought a yard and had plenty left over for another wreath for Fall!  I chose a thin one to get the desired look.

You'll also need:
Hot glue gun and glue sticks
floral or fabric pins
scrap fabric for flowers
felt for flowers
ribbon about 1 yard

Fold your burlap selvedge to selvedge and then in half cut side to cut side.  You will now have 4 layers.
Cut your layers into roughly 2" strips.  If you have a thicker wreath form you can cutter wider strips.
Now lay your wreath form down and pick a starting point.  Use your pins to attach an end of one of your strips to what will now be the back of your form.
Fold your strip down and put some hot glue above the pins.
Use the pins to hold the fabric in place as you pull the strip taught.  Because burlap is so openly woven, I found it helpful to use the pins to help with gluing so you don't burn yourself!
Wrap your strip around and add another line of glue below the pins.  Carefully wrap and hold until it's set and then remove the pins.
Now wrap your strip around until it's almost gone, overlapping as you go so no green shows through.  Burlap stretches a bit because of the open weave so you can make it work around the curve.

When you get to the end of the strip, glue it on the back side and cut so that the "seam" is on the back.


Start a new strip and continue on pinning...gluing...and wrapping...


Until the whole form is covered.  Overlap your starting point a bit and then fold the end of the strip and glue in place.
OK Done with the form!  You can stop here if you want!

I wanted to add some summery fabric flowers.  
To make the flowers, lay your felt out and use something round to trace circles and cut them out in various sizes.
They don't have to be perfect.
Now get your scrap fabric and cut a strip 1-2" wide.
The wider the strip, the fuller your flower will be.  If you're using thin fabric, cut a wider strip.  If you're using thicker quilting cotton, cut a little narrower.  If you want a shabby look, cut a little snip the width you want and then rip the rest of the way.  This will make the edges frayed.  That's what I did for the green flower.
Now tie one end in a knot.

Put a triangle shape glob of glue of your felt like this.
Glue your strip down with your knot facing up.
Now you're going to twist the strip and glue as you go.
Don't smash the fabric down too hard, just press lightly.  And BE CAREFUL!  I can't tell you how many times I've burned my thumb really bad doing one of these.

When you get the piece of felt completely covered, bring the end of the strip around to the back and glue it and trim it.
If there is a tail from the knotted end do the same.  Or not, sometimes I leave the tail, like I did with the yellow.
Now arrange your flowers the way you like them and glue them down.  You can leave them flat like I did for a more 3 dimensional look or glue them completely curved around the wreath form for a different look.

Almost done!
Tie your ribbon in a knot around the wreath.  Your knot should be at the length that you want the loop to be when finished.
Rotate your knot to the back

and tie another knot around the front.
Now make two loops
and tie them in a knot to make a bow.  Trim your tails to the length you want and apply fray check.
Now you can slide the bow up and down how you like it!
Hang that puppy up and enjoy the splendor!
I debated adding a little "hello." sign to this but I thought it was so pretty as is!

I'd love to see pictures if you've followed this tutorial.  As always, if you need clarification. let me know!

Happy making!

-Kalley


Thursday, August 1, 2013

Dinner Tonight: Sauteed Mushrooms over baked polenta & strawberry spinach salad

Well dinner tonight was really yummy and really easy!

 Sauteed mushrooms over baked polenta & strawberry spinach salad

So I started with these ingredients: 
1 bag sliced and washed mushrooms
A small bottle of white wine.  I chose Gallo Moscato because I like to drink that.  yum.  You only need 1/4 cup to cook with so you could use from a bottle you already have.
Basil & Garlic polenta from Frieda's organic.  I found it by the tofu in my grocery store's produce section.
2 cloves of garlic
Olive oil
(Not pictured) margarine of choice (to make this vegan you can omit or use earth balance or another vegan spread)


 Salad:
About 2 cups of washed baby spinach
About 1 cup of strawberries, washed and sliced
About 1/4 cup honey roasted almonds but you could substitute candied pecans or walnuts...yum!
Lite balsamic salad dressing
I later decided to use White balsamic vinegar instead of the dressing
 
So to make this meal, set the oven for 375.  Slice up the polenta and put the slices on a baking sheet.
Set that aside and mince the garlic.  Then, in a small saute pan, heat about 2 tbsp olive oil and 1 tbsp margarine or butter on medium heat.  Then add the garlic and let it sizzle but not brown.  Now add your mushrooms and about 1/4 cup wine.  Cover and let cook.
Put your polenta in the oven and set your timer for 15 minutes. 

Now work on your salad.  Slice your strawberries and add to a bowl of spinach and sprinkle your almonds on top.  Beautiful!


I'll be showing you modifications of what I serve my kids.  I have a 10 month old and a 3 year old so I often make modified versions of our meals for what they can and will eat.
So I scooped up some of the salad and put it in my hand food processor.  Then I set my little helper to work!
Good job Eisley!
It turned into something like a pesto and Cora loved it!


Now your mushrooms should be tender so uncover and cook off some of the liquid.  Be sure not to let too much of it go, you want some sauce!  When it's done, remove from heat.
Take your polenta out of the oven and add one slice and some mushrooms to the now empty food processor for the baby if you have one!

To serve, lay 3 polenta slices on the plate and top with some mushrooms and sauce.
Serve your salad and drizzle with your vinegar.
My daughter Eisley ate it exactly like we did but with only one polenta slice and boy did that kid eat every bite!

Here's another look at this deliciousness!
Some thoughts:
If you are not vegan, you could make some yummy modifications: add a sprinkle of parmesan cheese to the served up mushrooms and polenta and or add some feta to your salad.  mmm
Next time I make this, I will not reduce my sauce down so much and I will try either broiling or pan sauteeing the polenta to give it some crisp.

Please let me know if you've tried this recipe!  I'd love to hear from you!


Back in the saddle

Well here I am again!  It's naptime and I'm watching The Killing season 2 on Netflix and posting again!
So I have been lax in posting anything on here but I'm going to be posting a lot more now.  In the meantime, I had a beautiful baby girl, Cora Brielle, on September 19, 2012!  She's so gorgeous and she's 10 months old now!  How time flies!!

This past winter my Kalleymade business also picked up BIGTIME!  It's been fun and amazing the number of orders I've been getting and keeping up with them but in the end, I've decided to step back from that somewhat in order to spend more time with the family and to be able to ENJOY my crafting time instead of feeling under the gun.  I will still offer items for sale, but mostly not custom items, instead ready to ship items.  Anyhoo, my etsy shop is currently on vacation mode because we just moved (oh, did I forget to mention that?! haha) but you can check it out if you want.

So, my point is!! I'll be blogging more often on the custom pieces I DO take on.  I tend to do some really fun items but I will only make them one time so I thought I'd share!

I'll also be sharing some recipes and meal ideas as we are endeavoring on another vegetarian adventure!  If you know me, you may remember that we followed a vegan diet when Eisley was a baby (she's 3 now) but fell off the wagon.  We recently have decided to go back to that lifestyle.  A number of reasons: 1st is that my husband and I both say we've never felt better than when we ate a mostly vegan diet, 2nd is the research we've read indicating the affect the hormones in meat and dairy can have on a girl's reproductive system, among other things.  There are other good reasons too but those are the main two. 

Anyway, I'm about to whip up one of those meals for lunch so I'll see you soon!

Thursday, August 30, 2012

"Couch"-rest

Well so I have been sewing like crazy this week!  I have so many projects to complete!  I just shipped out an etsy order today and dropped off a large order to my local baby shop on Tuesday.  Still have a cake-pop order to complete before tomorrow (yep I do that too) and a custom costume to make asap, a custom order for the baby shop, and a custom top for a friend....oh yeah and I still have some stuff to sew for my baby girl before she arrives anytime!  So it figures that this is the week I would be put on modified bed rest!  Ughhhh!  I rode the little scooter around Target today, while I was there picking up the cake mixes.  Have you any idea what it feels like to be in your 20's and getting stuck in the isles of the baby section with a power scooter and then having to alert everyone around you with that "BEEP BEEP BEEP" while you back up?  Well I do now.  I just took a deep breath and said "This is best for my baby".  Oh the humiliation you go through as a mom sometimes!
So I do have some projects coming down the pike to share with you but I don't know when.  I hope to complete my next tutorial before she arrives because I really want to have it when I bring her home!  I'm going to be showing you how to make a normal boppy into one of those fancy new boppy newborn loungers!  Yeah, I still have my boppy from when my 2-1/2 year old was born and I don't want to buy another one so I'm going to make a slipcover that turns it into a lounger, but can be removed when I want to use it to nurse!  Clever ehh?? 
Hope you all are doing great!

Friday, August 24, 2012

Make a Boppy Slipcover: Tutorial

Wanna start out with a really easy project?  Know anyone who has or is going to have a baby?  This post is for you!!

I'll teach you how to make a Boppy cover without a zipper.  It's easy, it's cheap and it should take less than an hour.

Ok so for any sewing project, to start out you need a few things: besides the sewing machine and thread, you need fabric and a pattern.  I chose to use cotton on one side and super-soft minky on the other.  With this pattern, there is a bottom so you need to decide which one is going to be the top.  If you choose to use minky, there's no reason to use it on both sides except for aesthetics.  Minky is going to run you $14.99/yard (regular price) at Joann's so conserve your expensive fabric and use a cute quilting cotton on the bottom instead!  This also helps to make it a bit sturdier since Minky is very stretchy and cotton is not.
You need 1/2 yard of the top fabric and 1/2 yard of the bottom or 1 yard if you are using the same fabric.  There are so many cute fabrics out there to choose from!  I love all the printed flannels out there that are super soft too!  That might be my next one.

Then, you need a pattern.  If you have a boppy, take your cover off and fold it in half, then trace it 1/2" outside of the edge of the boppy except for the fold line.  I used a paper bag for my pattern paper.  If you don't have one or don't want to do that, you can find a free printable boppy pattern here.

Ok now that you have all your supplies ready, it's time to get started!!

Fold your minky (or whatever fabric you chose for the top) in half and lay it out.  Lay your pattern on top, lining up the FOLD line with your fold in your fabric.  Carefully cut it out.  You can pin your pattern down if you like.
When you're done, you will have a piece like this.  My little "helper" was with me, you can see.
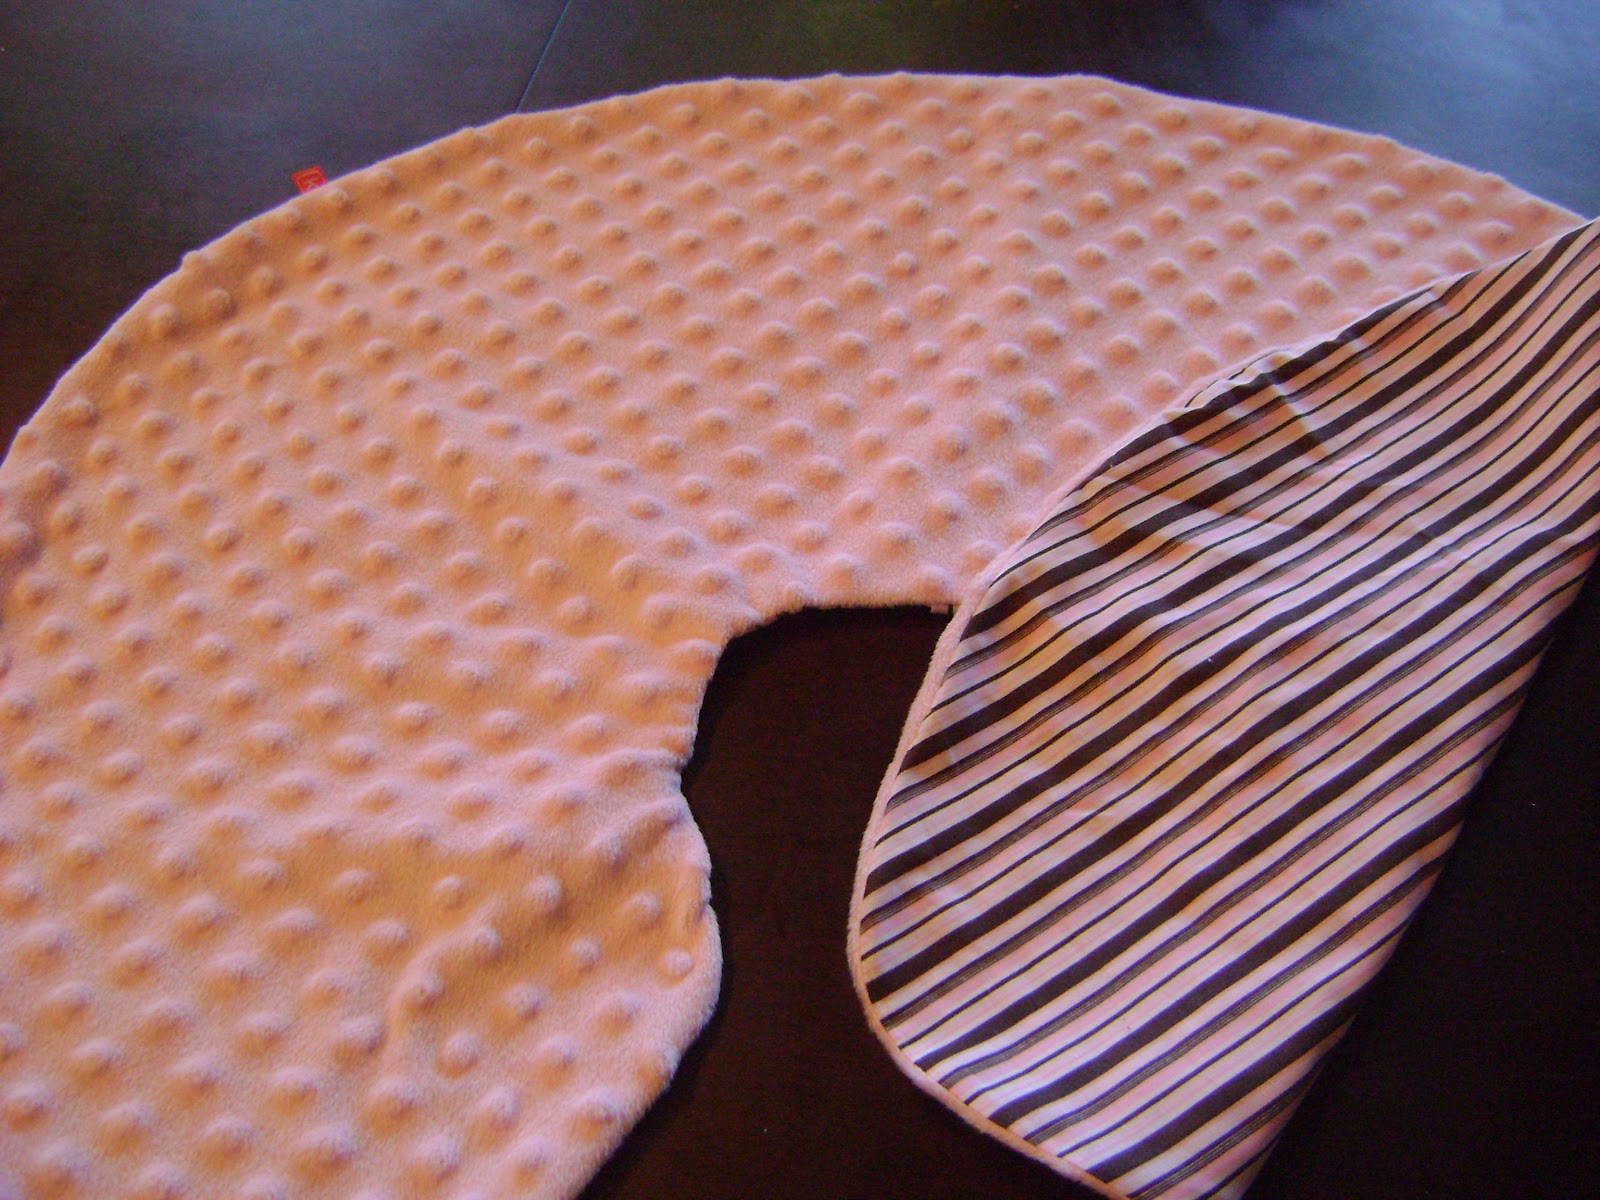
Then lay out your bottom fabric and fold it in half.  I used a striped fabric so it's very easy to tell what I'm doing here.  You need to lay your pattern down about 2" away from the fold of the fabric.  This is very important.  See the pictures.
Then cut it out.
Ignore the fact that I cut outside of my pattern.  I had originally made this pattern to exactly replicate the Boppy covers, which has another strip of fabric on the inside curve, but this one I wanted to be quick and easy so I omitted that step and adjusted the pattern.

Now cut this in half along the fold.
OK now usually, I try to avoid ironing and hemming but, this one is easy.  It's a straight line AND I used striped fabric so it's even easier!

 Take your 2 pieces of bottom fabric to your ironing board and iron 1/4" seam. 

Then fold again and measure another 1" seam and iron.


Now if you have a serger, you can serge it, cutting off 1/4" and then fold 1" and iron.  This is probably what I will do in the future, but it was naptime and this fabric just made it too easy!

Now sew your seam at about 7/8" and repeat for the other piece.  Don't forget to backstitch at the beginning and end of each seam.


Now lay your top fabric down face up and lay your two bottom fabric pieces on top, face down, overlapping in the center.
Pin generously!
Sew all the way around with 1/2" seam.  Backstitch the beginning and end of your seam.  I recommend starting on the side so it's not near a high-stress area.  Add a cute little label in there if you have one!
Your cover should look something like this.  I guess I was a little sloppy when cutting out my pattern.
Now, if you made your own pattern, I recommend you turn it right side out and test the fit.  Actually, I guess you don't need to turn it.
 I realized that I needed to take it in on the inside curve.
See how I just sewed another seam?  It'll be cleaned up at the next step.

Now you need to stabilize the seam.  Either serge it or trim it and run a zig-zag seam all the way around.
This really helps make the seam stronger and if you're using cotton, prevents fraying during washing.
Slap another label on there and you're done! 


Easy peasy!!!  I hope you will try this and let me know how it worked out for you!  I am going to make another one tonight!

If you are wondering just how cheap this project is, here's the breakdown:
1/2 yard of minky: $3.75 (I only buy minky if I have a coupon or it's on sale.  I had a 50% off coupon for Joann's)
1/2 yard of quilters cotton: $2 (You can easily get a cute print for $3.99/yd or use a coupon
Out of pocket cost: $5.75
Time spent: 1/2-1 hour

Boppy brand minky slipcover: $25.99

Whoo-hoo!  You just saved $20 in an hour or less!

Now go make a couple of these for yourself or your preggo friends!